Easy Peasy
by Phil Cooper
Here we go again with another blog. I’ve written quite a few recently. Does my ego show!!! We’ll now return to fortnightly blogs-can you cope with that???? Wot d’you mean, “too many”? Such cheek from Messrs Batley (again) and Stanley.
I’ve been scanning the Worldwide Internet for tips and advice and found good stuff at The Railway Hub and World of Railway AND even added my own tip. Batley, stop exaggerating your shock! I can do some things! Here’s another one-don’t buy a SGIN laptop. Their mousepads are like me – too sensitive. If you do foolishly buy one buyn an external mouse before you go crazy. I got a Logitech which works brilliantly.
With the warm(er) weather many of you real modellers will be out and about researching your next project. I’ll just be trying to clean mine up while smuggling trains past NannyBarb who has recently intercepted 2deliveries of “Curly Wurlies” from Giant Bradley (£16.80 for a box of 48).The evil woman hid them but I found them!

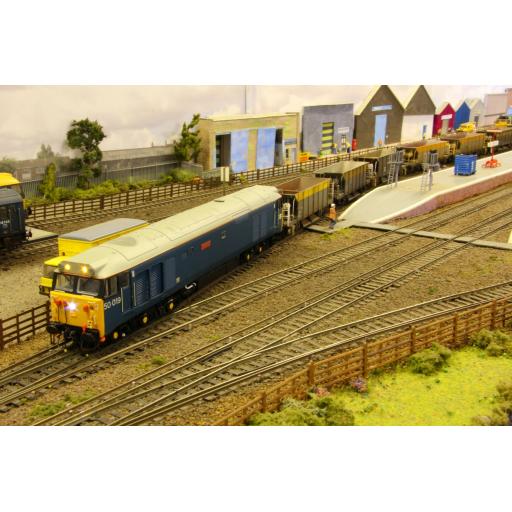
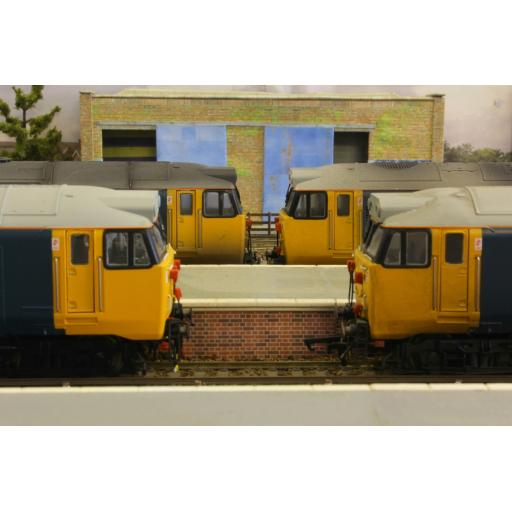
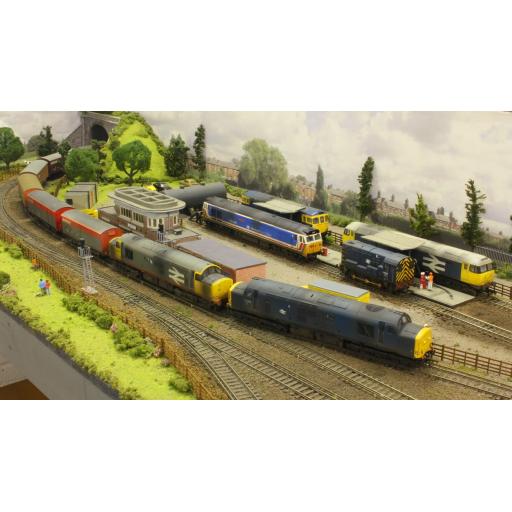
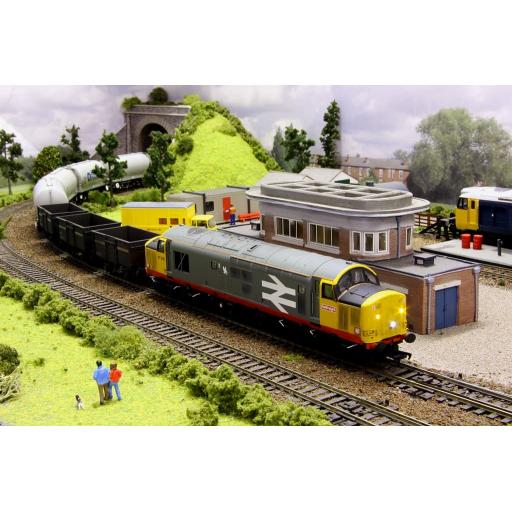
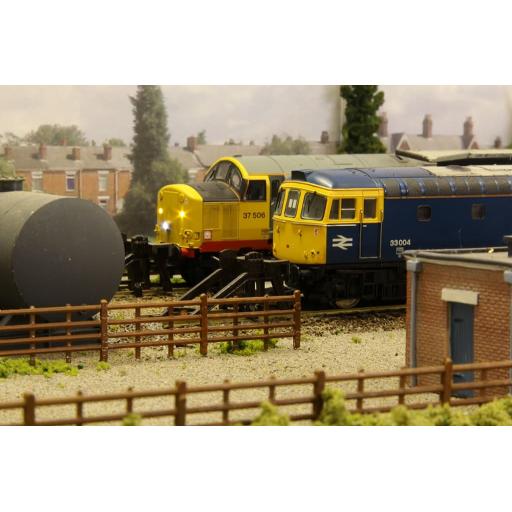
I signed up today’s modeller Jonathan to the blog a few weeks ago and then forgot about him. So, Jonathan I apologise. Your photos are super, full of diesels -great. Not a chuff chuff in sight. I think all the readers are going to love them too. Ladies and gentlemen and Messrs Batley & Stanley, I present this week’s superstar modeller:
JONATHAN FRANCIS


THE RAILWAY HUB
I discovered The Railway Hub website and App several months ago. They provide a great service on all aspects of railways, including modelling so, being a lazy sod I’ve nicked this modelling article just for you.
www.therailwayhub.co.uk
Working signals make a big difference to the look of a modern layout. We build Train-Tech's kit for the 2-aspect version.
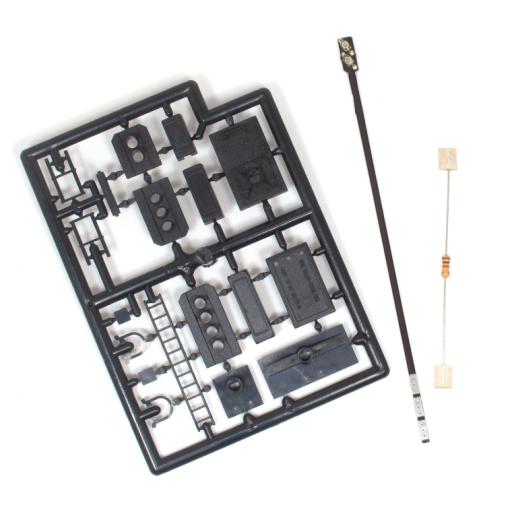
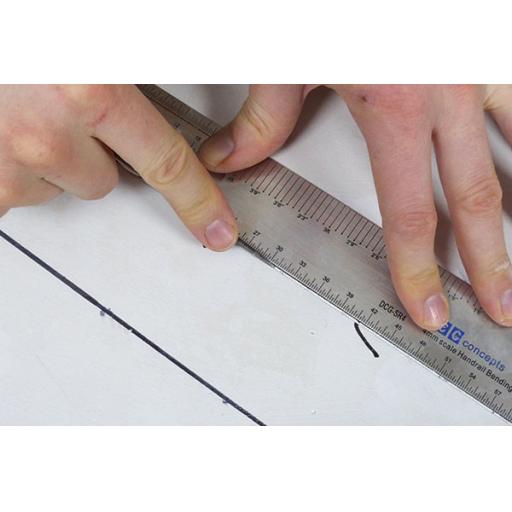
In the packet is a sprue of plastic parts that cover all the different signal designs. The leftover parts would make excellent line side clutter. The stick is a ready wired circuit board with a pair of LEDs at the top and power connections at the bottom. A resistor is included to reduce 12v to a level safe for the lights. Not shown, but included is a length of aluminium tube for the post.
All parts are assembled with plastic glues. I recommend holding the joint first with plastic cement, ideally from a dispenser with a long metal tube nozzle like Humbrol Precision Poly. This holds the part roughly in place but with some time to perfect the positioning. Then set it fully with a wash of liquid glue which will thin the cement and make an invisible join (you can just let the cement dry of course, but this tip is for impatient people like me!).

I painted the signal head around the light before fitting to avoid getting paint on the LEDs. Cutting the parts from the sprue took a bit of care and this is mentioned in the instructions, but as long as you use a sharp knife and support the parts, you should be OK. If not, repairs can be made with liquid plastic glue.
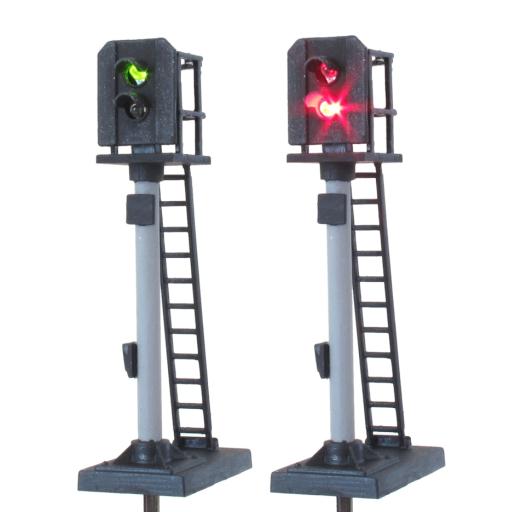
Green or Red - painting is simple – Humbrol Matt Black for everything except the post, which uses grey primer from a car spray can. Humbrol No.64 would work just as well, though. Signals don't tend to get very dirty, but dry-brushing the black parts with a dark grey, Humbrol 69 is a good choice, or dusting the model lightly with weathering powders will help it blend in.
The contacts are on a stick 6cm below the base of the signal, which might be a problem if you have a very shallow baseboard. A wiring diagram is included in the instructions so you can connect them to a switch on your control panel.
We used:
Train-Tech:
SK2 Home Aspect self-assembly signal kit - £8.00
Unfortunately, Train-tech is no longer trading. It was a brilliant company with some fantastic electronic products. Their website is still worth a look if you’re looking for electrickery although the company has been swallowed up by
gaugemaster.com
train-tech.com
www.world-of-railways.co.uk
This is another useful website worth some of your time. You can also sign up for free regular updates. I nicked some of their stuff for you as well
What is the model railway era system?
Many layouts are built to a specific date in time, and the railway era system helps categorise the history and group products to a certain period of time when they were operational in real life – it is especially useful for modellers as it helps to quickly identify which time periods a particular model is designed to fit.
It starts from 1804, all the way up to present day. The eras are generally divided up around significant milestones on the railway and changes to operational companies or governmental control.
The model railway era system is not a definitive log of history and there are many overlaps, it's better seen as a useful tool to help highlight the liveries and locomotives that ran during a specific time when modelling and signpost significant points of history for our real-life railways.
Why do some model railway era systems differ?
The era system has been adopted by most of the manufacturers and retailers in the UK, and it is very similar to the epoch system that is used in Europe and has been for several years prior to our own introduction.
However, the era system Bachmann and Hornby use are slightly different, with Hornby opting for an extended list of 11 eras (instead of the 9 Bachmann uses) to cover franchise changes during the privatization era.
The dates are largely the same for both, below is the Hornby era system, which we refer to on World of Railways.
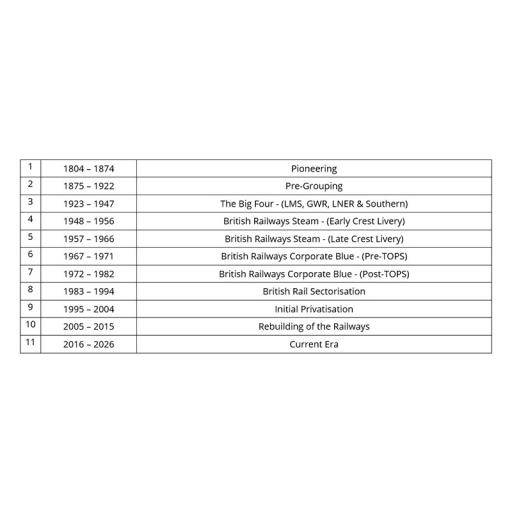
Things to remember
- Eras 1 and 2 are harder to model because of the lack of prototype information available and ready-to-run products, a lot of kit-bashing and scratch-building would be required to build a layout during this time.
- Although the eras are set to specific dates, it would have taken many years to complete a change of livery, so in the early years of an era, there would have been some crossover.
- Main line locomotives and coaches would have likely been changed first, while local branch stock may never have been fully updated.
How to make model railway hedges for your layout, tips on modelling different hedge types, and a guide on who makes what.
Hedges are everywhere in the British landscape, whether well-manicured or shabby and natural. Here's how to model them for your model railway.
What are the different types of hedges?
Hedging has been a common and longstanding feature of the British landscape since we stopped being hunter-gatherers and started to fence land in. It used to be more prevalent in agricultural areas, but the introduction of the combine harvester and the subsequent move to larger field sizes since WWII meant that many were removed, a process known as 'grubbing out'. Consider the era you're modelling before you start a build.
Hedges are still a common – and important – feature in the countryside and are also an important consideration for your model railway for realism.
Private hedges often border many roads, and these are clipped regularly, but less so when used as field boundaries. The age of a countryside hedgerow can be ascertained by looking at the number of species growing in it. The more there are, often, the older the hedgerow.
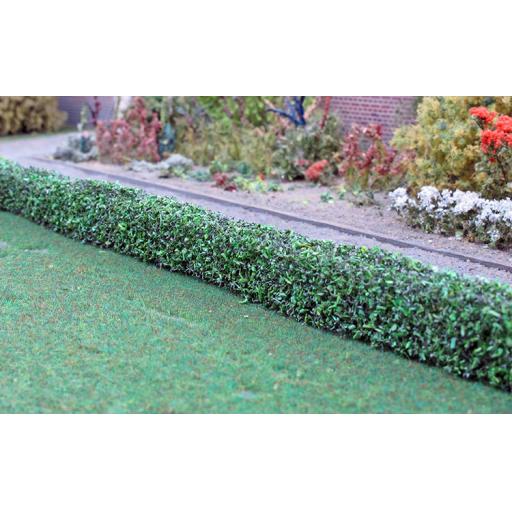
In urban areas, hedges tend to be monocultural and regularly clipped to maintain their shape, usually in the autumn. Often, they form a dividing line between properties, and each side is maintained by a different neighbour. Clipping often happens at different times, or not at all, and this imbalance can create interesting features to model.
When modelling hedges for your model railway, it's best to model an overall effect as a mass of different greens and textures, with just a few signature species that typify the location and time of year you're modelling.
Where can I buy model railway hedges?
There are many suppliers available that offer ready-made hedges that, aside from some subtle alterations to make them look more authentic, are almost completely ready to go. Manufacturers and suppliers such as Woodland Scenics, Hornby, Jarvis, War World Scenics and Howard Scenic Supplies have a variety of options available. Depending on the type of hedge you want to model, most suppliers offer model railway hedges for urban, agricultural, or countryside and cater for a variety of seasons, too.
It is always worth buying flock, or scatter material, to add to your hedges, which adds volume and colour variation.

I’m going to show off here because I made my own hedges from scourer pads. You can buy a pack of 10 for a couple of quid from Tesco, Sainsbury, etc.

Cut them into strips and spray glue all over them. Dunk each strip into a tray of static grass, stick on layout. Easy Peasy
Looking to cut the cost of your hobby? Green-fingered modellers can benefit from manufacturing their own scenery, as Howard Smith elaborates.
Unless you’re modelling an inner urban sprawl, most layouts need vegetation and trees. Replicating the qualities of static grass on a budget is difficult, but producing your own trees can often bring the best results.
It's a closely kept secret, but some of the most talented of scenic modellers create their trees or shrubs from live plants – either growing them from seed or foraging from shrubs or small trees around the garden. Growing your scenery is environmentally friendly, less expensive, and can be enjoyable.
Granted, not everyone has a garden, but perhaps you have access to a garden through friends or family? Some of the growing techniques are even possible in a seed tray on a windowsill in a flat!
However, we're not all botanists and besides, how does being green-fingered guarantee realistic-looking model trees? To save you the hassle of trial – and mostly error – when growing your own scenery, I've compiled a list of the species most likely to provide good results.
Most of the time you'll need to adapt the collected material to suit your application, so look beyond its initial shape. A variety of clumping and carving techniques can be used alongside model filler to create an impressive branch structure.
Don't be afraid to try; get outside and explore different species! Let’s get foraging and growing, make our money stretch further, and improve our layout trees.
Collecting material
The base of many a model tree can be created from twigs pruned from garden shrubs, or with permission, a wood or park. Fallen twigs are easy to collect, but are often rotten and will break easily, resulting in fragile trees. Pruned branches from shrubs are best used for larger layout trees. Why do so many layouts have weedy lollipop-style trees? Aren’t you tempted to model a great oak tree? Perhaps an elm with die-back in its branches? Creating these features from a plastic armature can be difficult, but when outdoors, you can select material that will work best for your application.
You can look beyond the ‘ordinary’, too. Though easily overlooked, roots can be easily adapted to form branches, and often make better trees than branches because of their often more gnarled appearance. Opt for small shrubs with a fibrous root system rather than larger ‘tap’ style roots. Pruning roots is often detrimental to the well-being of a plant, so it’s best to do this on plants that are being lifted or dying.

Harvested from a cut tree, suitable roots are easily found, and a few will go a long way to create an authentic model.
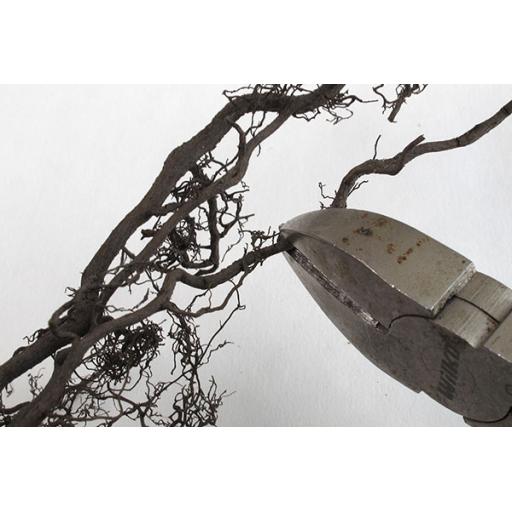
Fibrous roots can be kept in-situ to make smaller lateral branches. Trim excess branches to length with cutters.

The advantage of working with natural materials is that deadwood can be easily created, simply by removing bark from branches.
It’s rarely the case that a root or branch will have all the branches you need, and where you require them. Furthermore, if you look at a large tree in nature and observe the taper in thickness from the trunk to the twigs, it’s impossible to achieve this in model form to represent old trees realistically, in the space of 20cm or so. Even the best bonsai aren’t realistic enough for railway modelling purposes, and, speaking as an amateur bonsai enthusiast, it would be a shame to train one to then kill it and stick it with glue to a layout. Be prepared to cut and adapt several roots or branches and glue them with wood adhesive to make the tree you require.
GROWING YOUR OWN
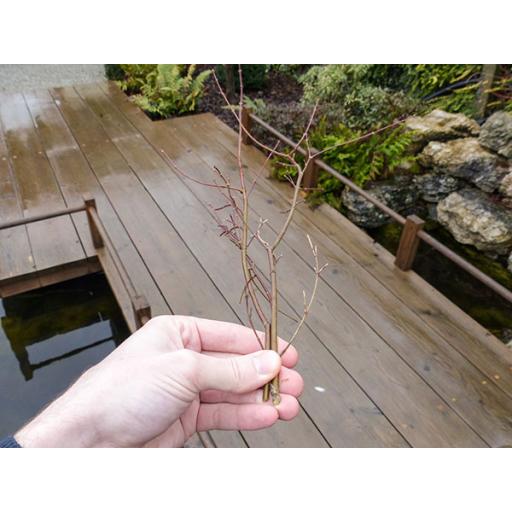
Teloxis Aristata or ‘Seafoam’

This low-growing plant is commonly referred to as ‘Seafoam’ by modellers and is often sold by scenic manufacturers to be made into custom trees. It provides a convincing effect when sprayed a brown colour and miniature leaves or flock powders are sprinkled over a layering spray or glue. Although not ideal for modelling ancient trees with thick trunks because of its spindly growing habits, if adapted and added to a thick trunk made from a collected branch or root, it makes a very convincing canopy. Seafoam makes realistic hedgerow trees and shrubs, too, and if you’re modelling a winter scene, you don’t even need to cover it with foliage! Growing your own simply adds another step to the process, but makes it less expensive, and you’ll have enough for your friends, too!
From the cold, dry Gobi Desert, Seafoam likes humidity to germinate, followed by dry conditions once established. Teloxys Aristata seeds will usually germinate in 7 to 21 days, but prefer to germinate with light, so sow fresh (not old) seeds in April over general-purpose compost, in seed trays, but don’t cover the seeds with soil. To make the seeds go further, mix them with fine dry sand and sprinkle lightly. A few plants make many model trees!
The plants have a habit of growing spindly if sown too close together, so once germinated transfer to the ground and plant at 20cm intervals for best results. If planted outdoors, they readily self-sow, meaning that you should have an endless supply of plants in subsequent years after your first batch.
Teloxys Aristata likes lots of light, so while you can grow them in a tray, inside, on a windowsill, you’ll need to rotate them often to keep the stems straight because they will chase the light. You could experiment by leaving them in a fixed position if you’re looking for a custom ‘crooked tree’ effect.
Wait until the plants discolour to an orange/brown hue at the end of August/early September and harvest them. The plants need to be dried and to prevent damage during this process, a 70:30 water/glycol mixture can be sprayed over them a few times a day but keep this mixture in the fridge when not in use.
After a few weeks, the stems are ready for use and can be divided, glued together to form clumps, or even ‘planted’ into holes drilled in harvested roots or sprigs to create larger trees.
Hylotelephium Herbstfreude or ‘Sedum’

These common autumn-flowering perennials exist in as many as 400-500 varieties, however, modellers can look to the herbstfreude variety for effective tree armatures. These plants need to be grown outdoors and enjoy lots of sun and can tolerate dry conditions. Just like Seafoam, the plants can be harvested in the autumn when they begin to die back and turn brown. Leave to dry, though store carefully because the plants are brittle when dry and can be difficult to separate. After spraying with the 70:30 water/glycol mixture, these can be trimmed to shape, bunched together to form clumps of trees, or alternatively, cut shorter to create realistic-looking bush armatures.
Achillea Millefolium or ‘Yarrow’

Similar in its structure to Hylotelephium Herbstfreude, Achillea Millefolium or ‘Yarrow’ is easily grown from seed, though be wary because if left to self-seed; it spreads easily and can become invasive.
For propagation, seeds require light, so sprinkle seeds over the surface of the soil, then cover with a very thin layer of soil. It is best grown in a greenhouse in seed trays where temperatures of 20°C can be achieved in the early spring while avoiding the chances of it spreading around the garden. For best results once germinated and to guarantee even growth of stems, transfer to small seed pots and propagate at a spacing of 1ft for even light distribution.
Once harvested, as with other plant types, trim off the dried flower heads before preserving with a 70:30 Glycol/Water mixture.
Spiraea Billardii or Salicifolia

Preferring well-drained soils, this deciduous suckering plant can reach its mature height of up to 2.5m after a decade and isn’t overly fussy about its climate. Unlike the other species presented, which can grow into viable model trees from seed in a few seasons, this species is slower growing. So, unless you, a neighbour, family member, or friend has a large bush in your/their garden, you’ll have to wait a few years until you can harvest enough flower heads, or ‘miniature trees’ for a layout. If you already have access to one, however, you’re on to a winner, with an almost endless supply of miniature coniferous trees!
The shape of their flowers when harvested and dried lends them well to evergreen trees, and their shape is easily refined with scissors. For best results, ensure flowers grow straight by propping flower stems up that are growing horizontally or towards the ground with garden canes.
Once painted
Trees aren't all the same height or shape in nature, and nothing comes closer to replicating their many different styles than growing your own plants or collecting cuttings and adapting them by sculpting with model filler, or gluing several together to create a larger structure.
A choice of realistic miniature leaves, static grass, foliage matting or ‘flock’ can be applied to your home-grown or collected realistic tree armatures, once painted. Whether you use a mixture of both on your trees, or one of each, you’ll save money, achieve better-looking results and use more environmentally-friendly products – what’s not to like about that?
Top tip
When dry, many annual harvested plants are brittle. Strength and a degree of flexibility can be achieved by dipping these into a 50:50 water/PVA mixture and leaving them to dry outside on a clothesline with a peg. The process can be repeated a few times, as necessary. To prevent further damage, spray the armatures with paint, rather than paint by brush.
Many layouts require tarmac and concrete surfaces that can be difficult to model. Howard Smith attempts his version, while adding animation using Faller’s Road System.
Paved surfaces can be one of the hardest things to create convincingly in model form. The textures and colours we witness on a daily basis are usually averaged by modellers to a single colour, be it a light grey for concrete or an off-black for tarmac. Paved surfaces vary in colour. Freshly laid bitumen is dark in colour, though through dust and wear, it quickly changes to a lighter colour. Concrete is the opposite, often darkening with an accumulation of dirt.
The wrath of Mother Nature takes its toll in changing the appearance of a surface, from freezing water in winter that creates stress cracks and potholes as does the traffic that travels across these surfaces, to dust in the summer. Heavy Goods Vehicles can soon destroy a thin layer of tarmac or compact it to form a hump in the middle of a road. Perhaps you’re modelling a quiet country lane with weeds in the middle? Or a street outside a house where cars that occasionally leak oil are parked? Don’t forget about drainage, road markings, kerbstones and road signage, too. Adding these details to your model will elevate your paved surfaces to the next level.
For the project layout, being an industrial site, many surfaces are paved, and it’ll be a good exercise in honing my tarmac- and concrete-making skills. For good measure, I’m using one of Faller’s Road Systems, too. Somehow, the idea of shunting wagons while avoiding moving road vehicles as they negotiate around the busy site seems quite appealing. Will they, or won’t they clash?
Shopping list
• Wall filler plaster
• Masking tape
• DCC Concepts black, white and grey weathering powders
• Scale Model Scenery (LX135-OO) Kerb Stones
• Rustoleum Grey Primer, Concrete and Matt Varnish spray paints
Tools needed.
• 3in and 5in scrapers
• Permanent marker
• Mixing bowl
• Humbrol Palpo, Coloro and Stipple brushes
The layout is ‘mapped’ using a permanent marker to trace the location of the roads. I altered the track from the prototype slightly to make for more interesting running, so the print-out OS map I’m using serves only as guide.

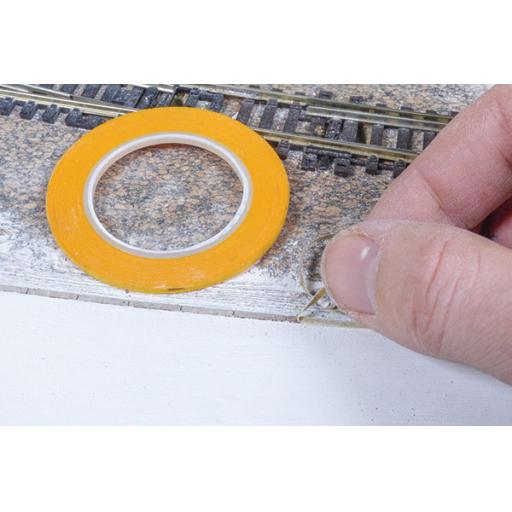
Before adding the hard-standing areas, Code 75 checkrails are installed from spare track. Generously supergluing them into place is sufficient, given these will be buried under plaster that will provide additional support. The rails are cut to length using Xuron shears.
Removing stray plaster from between the rails is a tedious task, so I’m masking between these, beforehand. It’s far easier to remove plaster this way than to scratch along the rails and potentially damage them, later.
Valuable cleaning time is saved. You could also try using an old wagon with Tri-ang standard wheels - pushing it along before the plaster dries to leave sufficient clearance for nearer-scale wheelsets.
Faller’s Road System contains a small bag of plaster, designed to be used as a thin skim. It doesn’t last on a project of this size which requires a 1-5mm thick covering to create the road slope. A few boxes of household plaster are used to create the road surface.

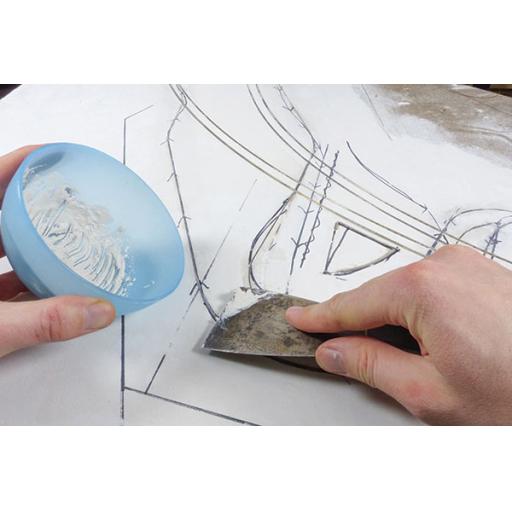
Before the plaster has set, I’m peeling the masking tape away, revealing the track underneath, undamaged and in fine fettle. Adding the plaster takes time, so I’m applying it in small stages, building up layers a little at a time.

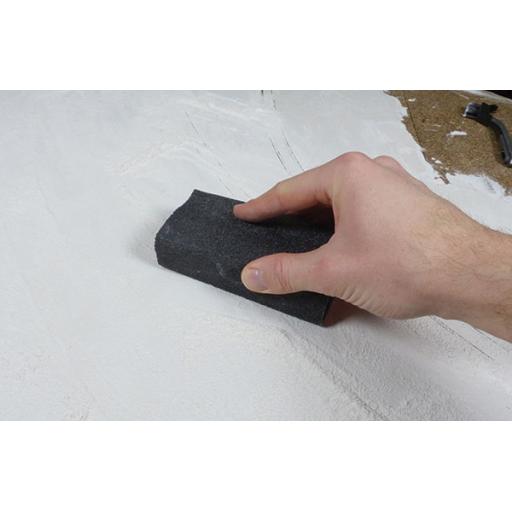
Sanding the plaster is important to make it level and smooth. It’s important to leave the rails slightly proud of the final height, to prevent wheels from being lifted from the track. Keep the vacuum cleaner to hand, it's messy!
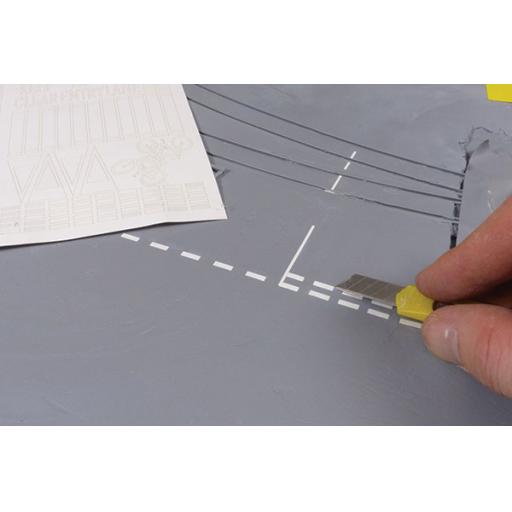
Referring to prototype photographs highlights the road edges, which can be cut easily to the desired curvature using a craft knife. The area shown will be filled with ballast, later. Some plaster is removed between sleepers with the knife, too.

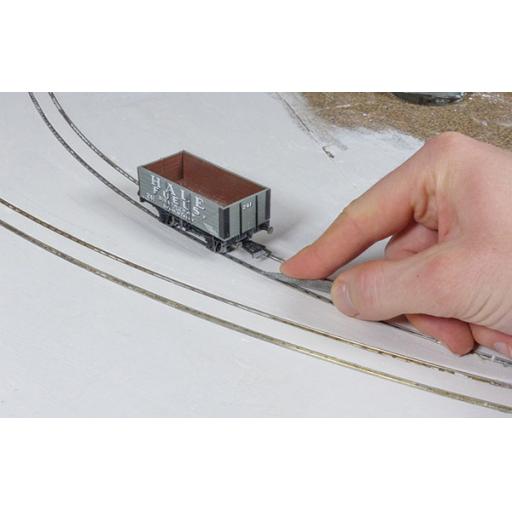
Plaster debris is removed between running rails and check rails with the sharp end of an old file. Be careful not to damage the fragile track chairs, underneath. Use a wagon to check for running issues and a track cleaner to polish rail surfaces.
The junction area of this model is where we shall now concentrate – it has the most variety in the mixture of road surfaces on the layout. Scale Model Scenery’s (LX135-OO) Kerb Stones are cut from the sheet and superglued over the plaster. These are rectangular and must be positioned with the cut lines facing outwards and the taller sides standing upright.

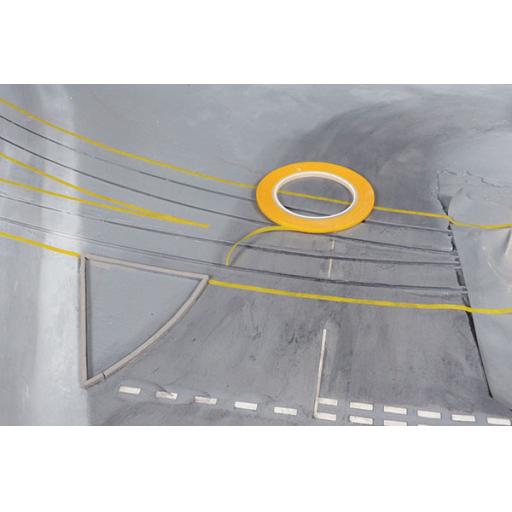
The pathway and direction of travel for the vehicles is determined and drawn on the layout with a marker. Crossing the tracks perpendicular is advisable, but not always possible. I’m ensuring that vehicles travel across most of the road surfaces.

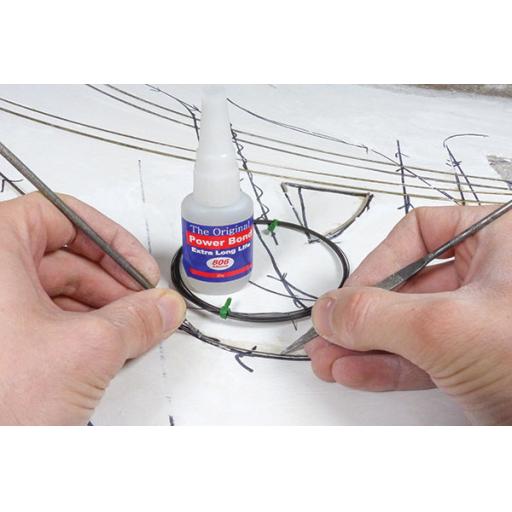
The sharp end of an old broken needle file is used to carve a pathway for the hardened steel guide wire. It must be below the surface, but only just. Bury it too deep and the magnets on the vehicles won’t follow it. A rule serves as a guide for straight sections, various mixing bowls for the curves.
The hardened steel wire will ruin the jaws of cutters, so use an old pair, or a slitting disc in a mini drill to cut. Powerbond 806 Cyanoacrylate is used to glue the wire in the holes in sections. Old files can be used to prise it into position.
Scale Model Scenery’s Kerb Stones are again used to edge a section of the road, as per images of the location. Fine masking tape was used to protect the laser-cut joins from the plaster.
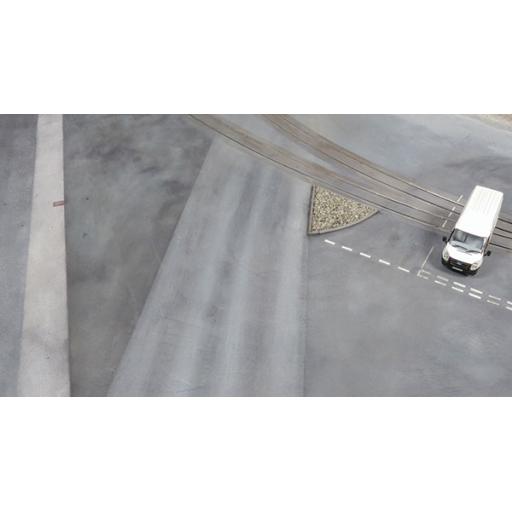
With the wire buried, the white van is tested. It’s here that I can explain the many lines on the board. Too narrow a turn radius results in the vehicle losing the wire and crashing. Too sudden a movement, and the vehicle will lose the wire and crash. A lot of fine tuning is required, particularly when the vehicle makes its way across tracks, diagonally. I’m making it this way as I want the gated entrance to the yard to be shared by vehicular and rail traffic. If you want an easier solution, purchase Faller’s laser-cut wooden road templates, available in curve, junction or straight variants.

Satisfied that the van works reliably after testing it around the circuit 10 times, a thin skim of plaster is used to fill the trench for the wire. I’m careful around the rails to prevent plaster from fouling the rail/check rail area.
Rustoleum Grey Surface Primer is a good start for giving the road areas a faded tarmac appearance. Note the use of masking tape to prevent overspray on the adjacent rails. The absorbent plaster requires a few coats for a more realistic appearance.

Road markings are self-adhesive from Scale Model Scenery. I tried its stencils, but whether dry-brushing or spraying, paint worked its way underneath because of a lip to the edges, spoiling the effect. A knife is used to position each, though ensure they are aligned.
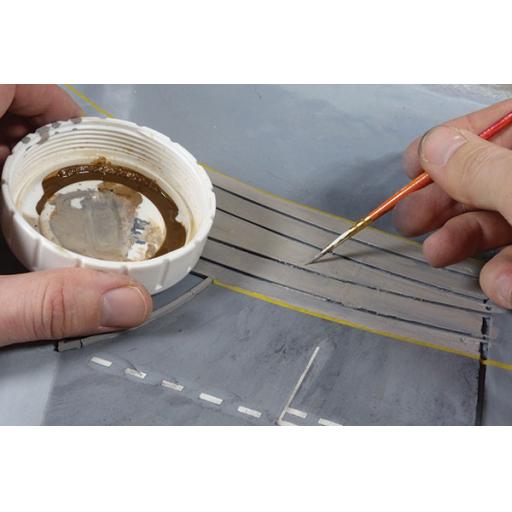
An even mixture of white and black weathering powders is worked onto the road surface to depict the worn surface. The concrete track infill is masked in preparation of its painting.
The road leading to and from the site has a distinctive white-coloured staining from the salt traffic leaving the site. Adding more of the white powder into the dry-brushing weathering mixture achieves this.

A combination of Comart 1015 Fertile Soil, black and white weathering powder is mixed to achieve a cream shade of concrete, referring to photographs for reference. The mixture is applied by brush, working carefully up to the edges of the tape.
Drains can easily be added to any layout using Scale Model Scenery’s AX013-OO sheet. Many different types are featured, including inspection hatches and water hydrants. I’m colouring the edges of the paper with a felt-tipped pen to prevent the white showing through.

A dab of superglue is all that’s required to fix this drain cover into position. Note the concrete-coloured strip, achieved using a can of Rustoleum Concrete Effect. This strip of concrete denotes the edge of the car park, where a fence will be later added.

Blending the colours of the tarmac and concrete together requires a lot of patience. I lost count of how many hours it took to dry-brush the tones together with various hues of grey weathering powders. I continued until I felt it looked right, referring to photographs.
The final addition, a little ballast, sprinkled in the centre of the junction triangle. This was then followed by a dilute PVA/water mix, though it caused the card kerbstones to delaminate, hence these will be replaced later.
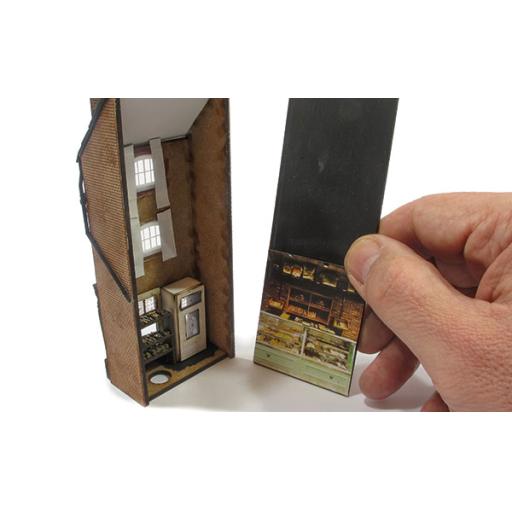
We all moan about the changing high street and lack of model shops in many towns. Phil Parker creates his own in miniature, with a hardware shop and baker's, too.
The high street is changing. Take a look at photographs of your local town from the 1950s and compare them to today. Most of us will notice that rows of independent traders have been replaced by chains. Shops are bigger and wider too. It's all very efficient, but there's not much character.
Petite Properties Station Road range of shops are the perfect antidote to the modern high street. They could fit into any town or city from the steam era and wouldn't look out of place in smaller rural towns today. The kits provide a basic building, but the finish is left to the individual modeller.
Setting the period can also be achieved by your choice of shop name. Some chains have long since disappeared but will be fondly remembered by anyone looking at your model. C&A for clothes shops, or perhaps Beatties if you fancy reminiscing about drooling over models you couldn't afford.
Local shops were often simply named after their owners, but years ago this would be very formal. I've built 'P.S.Parker' for my baker's shop as this is firmly pre-1960s. 'Phil's Cakes' would be much later and 'Cakes@Phil's' pretty much up-to-date.
An all-important part of any shop is the window display and for the baker's and hardware store, I'm using kits from Langley Models. It's worth taking a good look at its stand if you see it at a show. As well as complete kits, many of the individual castings are sold separately for pennies. For many years I've bought many useful bits for models this way.
Somewhere along the line when discussing this project with my colleagues, I rashly promised a working train set in the window of the model shop. The result is easily the smallest model railway I've ever built, but it works and wasn't too difficult to achieve. People I've shown it to are both impressed and think I'm mad!
What we used
Bachmann
WSL Scenecraft (44-275) Low Relief Model Shop
Petite Properties
No. 10 Station Road
No. 12 Station Road
Model Railway Scenery
4mm lettering (LX037A) (Swindon)
4mm lettering (LX037C) (GWR)
Scale Model Scenery
Roof Slates (LX228-OO)
Expo Tools
Clearbox Motor and Variable Gearbox (26210)
The Bakers
I'm using Petite Properties 'No. 10 Station Road' kit. Like all the models in this range, it is supplied in laser-cut MDF and cardboard parts, which the modeller has to assemble and decorate. Instructions cover the basic build of the model and provides details explaining how the model seen on its stand has been decorated. You can adapt the building to make yours different from others.
After a dry-run, I assembled the shell of the building using PVA glue. Check everything is square, wipe away glue that has oozed from the joints and leave to dry.
On the front, I add the main shop window parts as a guide for the next stage, but left the doorway separate as it's easier to paint and detail this way. Be sparing with the glue, keep a tiny screwdriver handy to run around the insides of the mouldings to deal with excess glue.
For the brick finish, I'm using Slater's English Bond embossed Plastikard. Cut it oversize and fix with a smear of all-purpose glue (I'm using UHU Power). Run liquid plastic glue down the corners to ensure they bond fully. Once dry, trim to size with a sharp knife.

The rounded window top decoration isn't available commercially, but can be made by scribing an arc on the back of brick Plastikard with a pair of compasses. Keep running the points along the sheet and eventually you'll form enough of a groove that it can be snapped along the line. Scribe some vertical lines with an Olfa cutter or blunt knife to complete the piece.

The shop sign is from Model Railway Scenery laser-cut letters. I'm using a serif font for a vintage look. Before starting, put them in place without glue, to make sure the words fit. Aligning the letters can be tricky - look along the model from the side and turn it upside down. It's amazing how doing this shows badly-positioned characters. A slow-setting glue allows some wiggle time.

Glazing, including the rather attractive stained glass, is included in the kit and just needs to be fixed in place with a suitable clear glue. Don't use superglue for this as the fumes will be attracted to grease from your fingers on the clear plastic, fogging it.

Langley Models Baker's shop fittings are really intended to fill an interior, but one of the racks works just as well in the window, covered with a delicious selection of baked goods. I use a thick superglue to assemble the parts.
After much research staring into bakers' windows, I opted for a selection of pale brown colours with a few cakes topped with white and pink paint. This is a 1950s baker, so I doubt that some of the garish colours available today would be appropriate. For pink, I used flesh colour, even though the thought is distinctly unappetising.
While the rack of food hides most of the interior, before fitting the shop back, I add a printed photograph, found on the Internet to provide a suggestion that there is more inside the building. Finding a suitable photograph proved much harder than I expected, so if you're visiting a museum with shops, it would be worth snapping something suitable.
A finishing touch comes courtesy of some Humbrol Smoke weathering powders, brushed around the chimney tops and higher parts of the roof.

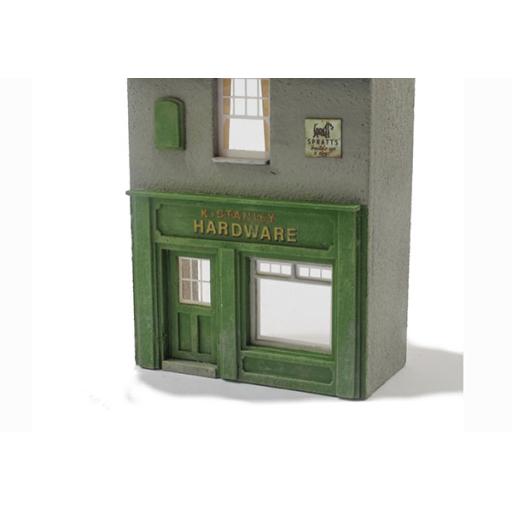
The Hardware Store
Petite Properties No. 12 Station Road is shorter than the No. 10 kit, but a variety of building heights will give the finished row of shops more character. They are used in a different order to the manufacturer's suggestion, simply because I think they look better this way round. It's my model, after all!

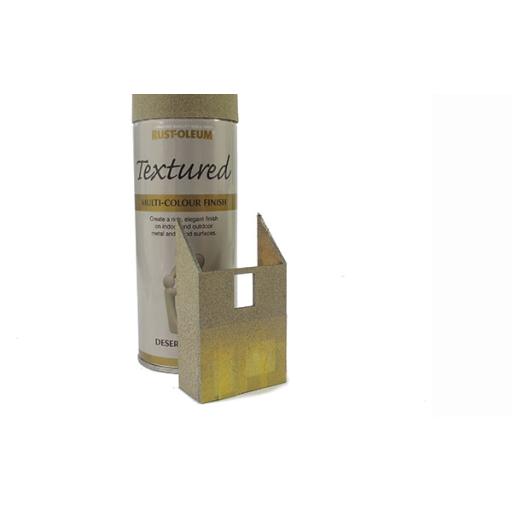
To model a rendered finish, build the basic shop without window detail. The area where this will be is masked off and the building sprayed with textured paint from a DIY store. While very quick to use, it's essential to practise on scrap wood with this stuff before working on your model. I needed to spray from well over 2ft away as the pressure in the can is very high. Thin coats look a lot better than thick ones too, but you can build up the effect very quickly.
As with the Baker's, the window detail is built up from the card parts. The sign is made using some old Mabex waterslide transfers that kept breaking when I applied them. I turned this into added character by dry-brushing the shop front to make it look as though Mr. Stanley's emporium is past its prime and could really do with attention from some of the products he sells.
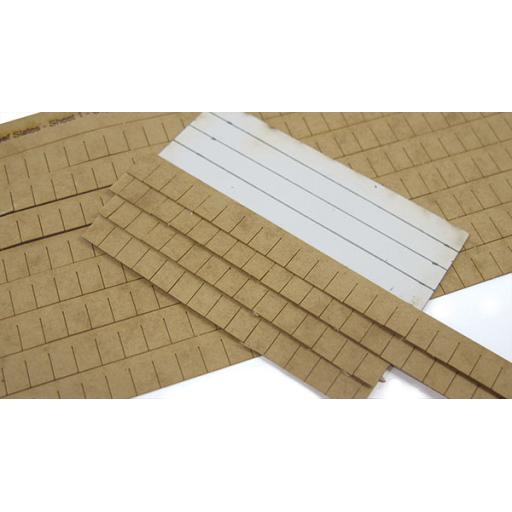
Cardboard roof slates on this and the baker's are a scalemodelscenery product. Draw lines 5mm apart on the roof and use these as a guide for applying the strips of laser-cut slates, making sure you stagger the joints. I'll trim these to length once they are dry, because it's easier then trying to do this before fitting.
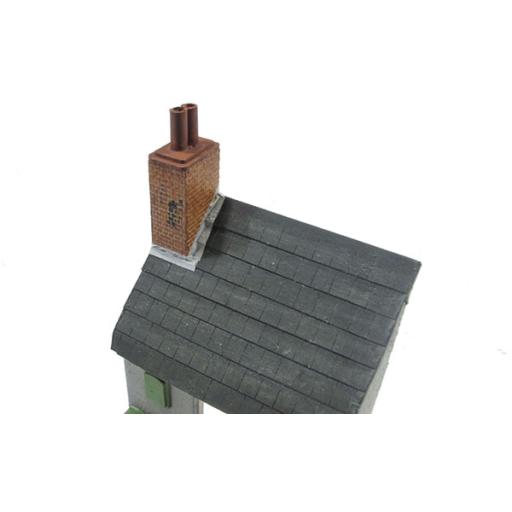
The chimney is a separately-applied part that has to be stuck on the roof. To hide the inevitable joint, cut 3mm strips of cigarette papers and stick them with PVA glue. A coat of greeny-grey paint later and you have realistic lead flashing just like a real building, and no gaps.
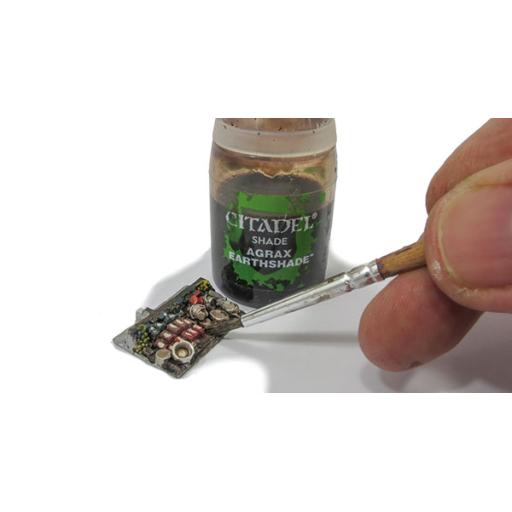
A fine selection of whitemetal parts from Langley Models Hardware Shop Fittings set. Some of these are designed to be hung on, or stood at the front of the building, a common way to display items for smaller shops.
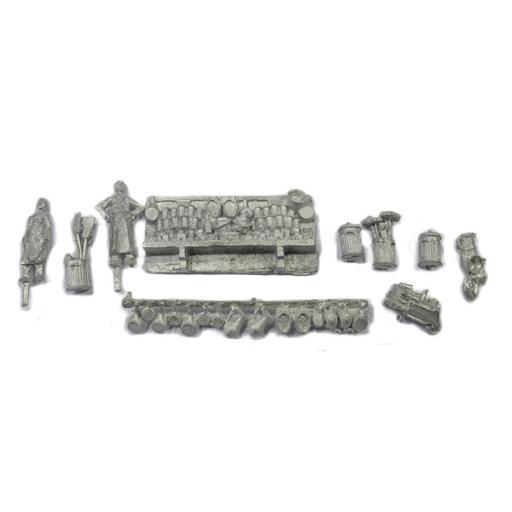
Picking out individual products on the large display piece is a little fiddly. Metal items can be left untouched as the whitemetal is a good colour match for the prototype. Rather then worry about perfect painting, I wash the whole thing with some Earthshade from the Citadel range. This ink sits in the darker areas, sharpens the look and blends the colours.
Shopkeepers would normally live above their premises, so the upper-storey windows need curtains. I cut strips of paper from Sunday supplement magazines. If you look at the edges of the adverts, there's often blocks of colour big enough for our use, and it's quicker than painting.
The Train Shop
I'm using the Bachmann Low Relief Model Shop for this model. It's ready to use, but a little modern for the scene I'm building. As a resin model, the walls are a lot thicker then the kit-built models, but this shouldn't be a problem. The material is quite brittle so don't drop it, or you'll need some superglue to fix bits back on. Don't ask how I know this.

First job is to remove the windows before painting. These can be carefully pushed out from the back, taking care not to bend the fine etched-brass frames. Put these, and the glazing, to one side in a safe place so they can go back in later. The sign is a transfer, but can be scraped away with a knife blade.

Brickwork on this and the baker's are painted with Humbrol 121 (Pale Stone) and then dry-brushed with 70 (Brick Red) and 62 (Leather). It's important to do this rather than using the building as supplied so all the models have a consistent look, even though painting a pre-painted building might seem odd.

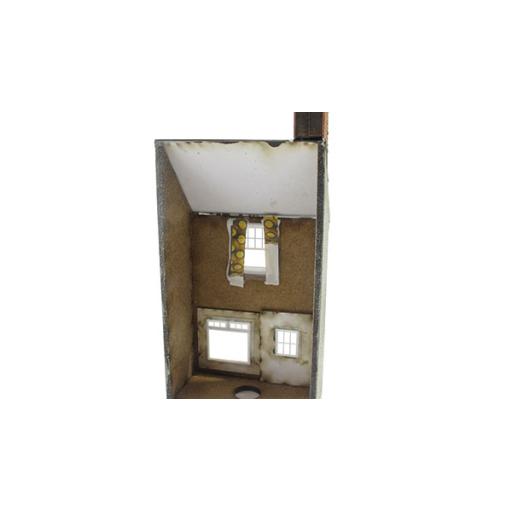
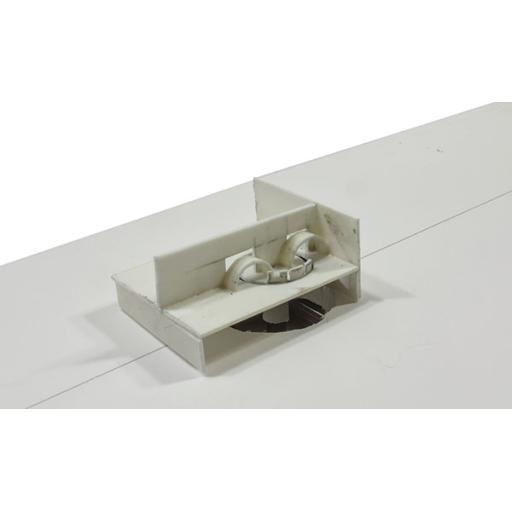
Building a working train set smaller than a 20p piece starts with fitting a disc of Plastikard to the top of a Clearbox motor and gearbox set. By using all the gears in the set, the disc turns at 4 rpm so the little plastic cut-out train isn't belting around unrealistically fast. The scale of the model is a mystery – big enough to see, but not so large it looks odd.

My scene sits on top of a box made from foamboard with the train on its disc poking through. Over this sits the layout made of 1mm Plastikard. The backscene and tunnels support the centre disc. It's important that the gap the train will run in is wider then the train itself so there isn't any friction between the two parts.
Some hills from Milliput and a couple of simple buildings cut from square-section plastic, and the model is complete. It's not that easy to see through the shop window so limited detail will be fine. Model railways of this era weren't that detailed, anyway.

No back is provided with the building, so I cut one from of a sheet of thick card and painted this black inside. An extension at the back covers the railway layout. And that's it - job complete! Three different shop windows created, plus working train set!


How do I avoid gaps underneath the buildings on my layout?
by John, Budbrooke.
It's the little details that matter on a model railway. Years ago, I exhibited next to a P4 layout, where great efforts had been made to use the correct scale and track gauge, but there were gaps under many of the buildings, ruining the effect.
Phil: The best way, or at least the method used at Pendon, is to fit every building with its own set of foundations. The Pendon models extend several centimetres below ground level, fitting into pockets made in the scenery. The results are perfect, but it's a lot of work.

Assuming a flat baseboard and a flat building bottom, the first step is to make sure they are as in touch with each other as possible. Don't just plonk the model down in some glue, put a bit of weight on top so it settles down properly. A small hammer carefully lent on the roof will do as you can see - just be careful that the model is strong enough to cope.
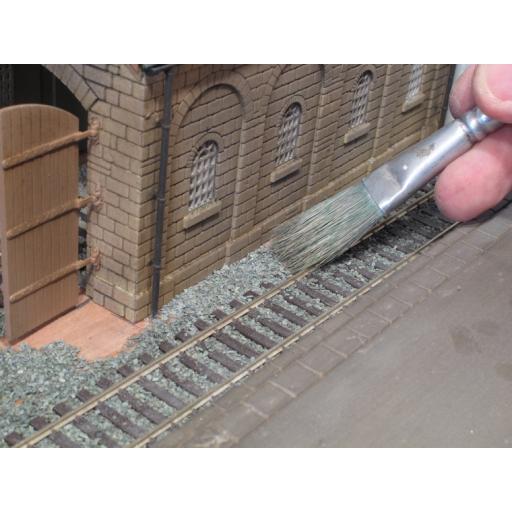
Always put engine and goods sheds and platforms in place before ballasting. Those little stones can be brushed up against the edges and will easily cover up the gaps.
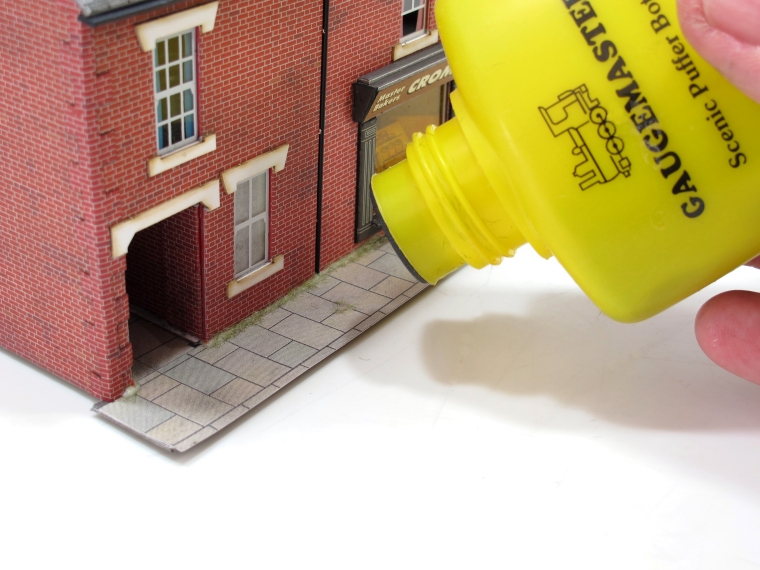
A static grass puffer bottle is the next tool - add a little glue around any gaps and puff the fibres in once it's gone tacky. Weeds and grass growing in cracks and crevices are pretty common, especially in the sort of scruffy areas we tend to model. Don't go mad with this stuff, less is more.

For really big gaps, you'll need to get creative with the undergrowth, but if you look around, it's surprising just how much undergrowth is out there.
Thank you to The Railway Hub and World of Railways for their help

If you would like to read more blog posts from Phil check back every two weeks or sign up to our newsletter to keep up to date on site news or when the blog posts go live.
The views and opinions expressed within the content are solely the author's and do not reflect the opinions and beliefs of Trackside Signs or its affiliates.